the Lovely Wild

  • Blog
  • Archive
    • :: Archive
    • :: Apothecary
    • :: Celebrate
    • :: DIY
    • :: Eat
    • :: Wander
  • About
  • Design
  • Contact
9holidaygifts copy.jpg

9 Simple and Intentional DIY Holiday Gifts

December 18, 2017 by Hailey Faust in :: DIY, :: Celebrate, :: Apothecary

There's still time, dear ones! We have scoured the Lovely Wild archives for a few of our favorite DIYs this holiday season. From herbal beard oil to hand-painted moon phase flags, each of these simple and intentional gifts can be made in a single afternoon. A lovely excuse to slow down and breathe deep and work with your hands. All you need is a few supplies and a fresh cup of peppermint tea. Oh, and a few inches of fresh snow if you have it. 

Featured
Apothecary :: New Moon Herbal Dream Pillows
DIY :: Sandlewood Beard Oil with Rosemary and Cedarwood
steam_20170129-_85B8307.jpg
Apothecary :: Mood-Lifting Lemon + Rose Winter Tea
Apothecary :: Elderberry + Echinacea Syrup & Golden Turmeric Milk
DIY :: Hand Stamped Brass Bracelets
Apothecary :: DIY Lemon + Rosemary Sugar Scrub
Easy Homemade Maple Pecan Granola
DIY :: Watercolor Moon Phase Flags
Dark Chocolate Cherry Almond Biscotti

Sending all my love to you and yours, sweet friends. 

xo,

Haileysignature.png
 
December 18, 2017 /Hailey Faust
DIY, holiday gifts, diy christmas gifts, christmas, herbal, apothecary, the art of slow living, slow living, holiday decorations, easy, last minute, the lovely wild, moon phase
:: DIY, :: Celebrate, :: Apothecary
Comment
steam_20170129-_85B8307.jpg

Apothecary :: Mood-Lifting Lemon + Rose Winter Tea

February 01, 2017 by Hailey Faust in :: Apothecary, :: Eat, Gifts

I learned a deep love of tea from my mother. Growing up, every morning before school I was cheerfully greeted with a tiny steaming mug of English Breakfast and a thick slice of homemade pumpkin bread. It's her answer to just about every scenario. Bad day at work? Tea. Horrible breakup? Tea. Being audited by the IRS? Double tea. To this day, the first words out of my mother's mouth every morning are, "Let me make you a cup of tea." Before "good morning." Before "hello." Before anything - tea first. There's a woman who has her priorities straight. 

So it's no surprise that a cozy cuppa is my go-to when I am in need of a little comfort. I don't think I'm alone when I say these past few weeks have been...challenging. The political and meteorological climate, combined with a marathon of sunless grey days has left me feeling a bit lost. Untethered. Overwhelmed. Exhausted. Let's be honest - January is always a little brutal, but this year felt particularly rough.

In life's more difficult seasons, it's especially important for us to double down on self-care. In order to show up for each other and the world, we first need to fill our own tanks and hold space for ourselves. Brewing a cup of soothing herbal tea is a wonderful exercise in daily self-care. I love the act of mixing the fragrant herbs, boiling the water, quietly meditating as it steeps. This simple ritual feels so grounding and restorative. A momentary time-out from the daily chaos. One of my favorite recipes for this time of year includes lemon balm and rose petals. The lemony flavor is bright and cheerful while the rose adds a lovely floral note and the smell of spring. Both have been long prescribed by folklore to lift the spirits and chase away the mid-winter blues. 

So let's all take a moment to slow down and breathe deep and drink some flowers. Here's to a brighter month ahead, dear ones.

***Disclaimer: I’m not a doctor, nurse, or licensed healthcare practitioner. Some herbs and botanicals are not safe for pregnant or nursing mothers and may not be suitable to take with certain medications or conditions. This information is not meant to diagnose, treat, cure, or prevent any disease. Always consult your doctor before beginning any kind of new vitamin, herbal, diet, or exercise regime. Make sure to research all of the ingredients to make sure they are safe for you and your family. 


Ingredients

- 1 part organic edible rose petals

- 1 part organic edible lemon balm

- 1/2 part organic edible linden leaf

- 1/2 part dried lemon peel

Instructions

1. Loosely measure out all ingredients in a bowl. You can use a mortar and pestle to break up any large pieces if necessary. The ratios here are merely suggestions so feel free update according to taste. I would recommend experimenting with a few pots of tea to see what you like before mixing a large batch. 

2. Store in an airtight jar or tin (these also make lovely gifts!)

3. Use 1 tsp of the mixture per cup, or 2 - 3 tsp per pot of tea. Pour boiling water over strainer with tea and let steep for 3 minutes. I like to use this opportunity for a little mini-meditation.

4. Garnish with a slice of fresh lemon. Breathe, relax, enjoy. 
 

20170129-_85B8337.jpg

xo,

 
20170129-_85B8252.jpg
February 01, 2017 /Hailey Faust
apothecary, slow living, the art of slow living, tea, the lovely wild, lifestyle blog, DIY, herbal remedies, winter, christmas, diy christmas gifts
:: Apothecary, :: Eat, Gifts
4 Comments

Apothecary :: DIY Rose Water

August 15, 2016 by Hailey Faust in :: DIY, :: Pamper, :: Make, :: Apothecary

And just like that, it was August.

Slowly but surely, summer is slipping quietly out the back door, leaving only a few precious weeks of bursting gardens and heirloom tomatoes and sun-drenched afternoons trailing behind her. I love how everything becomes a little wild this time of year. A little overgrown. Untended. Abundant. Exploding with life. Maybe it's the heat, or the heady scent of jasmine, but these final weeks of summer always makes me a little dreamy. Nostalgic. Less bound to reality. 

I'm always looking for ways to preserve the last few golden drops of sunshine and squirrel them away for the coming season. A steaming cup of lemon verbena tea and a jar of wild huckleberry jam can go a long way in the cold dark days of winter. January Hailey is always elated, and a little surprised, that August Hailey had a few fleeting moments of foresight.

Distilling a batch of rose water is one of my favorite late-summer rituals. An ancient remedy, rose water can be used in everything from facial toner to teacakes. Cleopatra swore by rose water for supple skin and, according to legend, Michelangelo drank it every morning with his tea. There is old magic in this stuff. I personally like to sprits a little on clean sheets and laundry, or add a tablespoons to bath water if I'm feeling extra fancy. It can even be used in the kitchen to add a delicate floral note to aromatic dishes and sweets, or as a cooling body mist on hot days. The possibilities are endless. A few minutes of time invested now will pay itself back ten-fold when you have this lovely tincture waiting in your apothecary.  

The key to high quality rose water is (surprise, surprise) high quality roses. Be sure to use only fresh organic roses that have never been sprayed with anything. The more fragrant, the better. This is the perfect project for the rose bush out back that has started to shower her petals. There is something deeply satisfying about finding a second life for fading blooms. 


You Will Need: 

- Fresh, fragrent organic rose petals

- 1 tray of ice cubes

- Large stock pot

- 2 oven safe jars or ramekins 

- Distilled water

Instructions:

1. Separate the petals from the roses and rinse with fresh water to remove any dirt or insects. 

2. Place petals in a large stock pot. 

3. Place a wide-mouth jar or ramekin upside down in the center of the pot. This is essentially just used as a base to lift the second jar off the bottom of the pot. Place the second jar right-side up on the ramekin. This jar will collect the rose water.

4. Fill the pot with water until it just covers the rose petals. The collection jar should be above the water line. Place the lid upside down on the pot and heat on medium until the water begins to boil. 

5. As soon as the water boils, place ice cubes on top of the upside-down lid. This will help bring the rose-filled condensation to the center of the lid where it will slowly drip into the waiting collection jar. 

6. Gently simmer for 15 - 20 mins or until the petals start to lose their color. Be sure not to over-cook, as this will dilute your rose water and change the fragrance. 

7. Turn off the heat and let cool for a minute. Using pot holders, carefully remove the lid which will now be filled with water from the melted ice cubes. Gently remove the jar filled with rose water (careful: it's hot!) and quickly transfer it to a waiting receptacle (or just put a lid on the jar.) The lovely rose oil you have just distilled can slip away as vapors so it's important to contain it quickly. 

8. Store in a cool dark place until you need a little splash of summer in your life. 

Have a lovely week dear ones.

xo, 

 
August 15, 2016 /Hailey Faust
DIY, apothecary, rose water, lovely wild
:: DIY, :: Pamper, :: Make, :: Apothecary
Comment

DIY :: Hand Stamped Brass Bracelets

March 14, 2016 by Hailey Faust in :: DIY, Gifts

March blew in on a cold wind from the east and brought with it the smell of fresh rain and the promise of Spring. It's coming, you guys. Spring. Is. Coming. There may still be a few late snows standing between us and it, but the light at the end of the tunnel is growing brighter every day. In like a lion, out like a lamb...isn't that what they always say?

The first fluttering breaths of spring are some of my favorite moments of the whole year. There is something so lovely and cleansing about throwing open the long-sealed windows to welcome fresh air into the house. This season buzzes with new energy. It encourages us to venture out from our cramped dens to stretch our legs and feel the cool breeze against our skin. To let the smell of wet soil and new grass fill our nostrils and refresh our spirits. To plant seeds of both the vegetable and spiritual variety. To sweep out the old and create space for the new.

Spring cleaning. It's a thing for a reason. 

Rooster and I spent the weekend shaking off the dust of winter and embarking on our own mini spring clean. We moved into this nearly century-old house on the first blizzard of winter (literally - 10" of snow the day we moved in), so we are happily unearthing little surprises that were hidden by the snow until now. Yesterday, R discovered a secret bed of irises sprouting triumphantly near his wood shop. They had been completely covered by a pile of old wood and were yellowed from lack of sunlight, but still they grew. Plants are magic like that. 

After cleansing the house, I was feeling refreshed and wanted to take the opportunity to plant some seeds of a different nature. I had a few brass bracelet blanks rolling around the back of my craft drawer that seemed to be just the ticket. I brewed a cup of strong tea and stamped each bracelet with a phrase or intention that reminded me of it's recipient, then popped them in some pretty envelopes heading for far away friends. I'm hoping these little lovelies work as gentle, pretty reminders to slow down, make space and smell the rain in the hustle and bustle of the coming months. 

stamped1b.jpg
 

Supplies

- Brass Bracelet Blanks 

- Hammer

- Steel block

- Metal Stamping Alphabet

- Masking Tape

- Permanent Marker

- Rubbing Alcohol

Instructions

1. Start by using masking tape to attach your bracelet blank to the steel block. Make sure the tape is straight, as you will use this as a guide for your letters. Next, take a marker and evenly mark a dot on the tape for each letter in the phrase you are stamping. This should help you keep the letters even and at least kind of straight.

2. You may want to place your steel block with the taped blank on a book to dampen the noise a bit. Take your first letter stamp and line it up with the first dot you marked on the tape. I gave mine about 5 - 8 good whacks with a stamping hammer and it made a nice impression. Repeat the process with the rest of your letters, using the tape as a guide to keeping them straight and even. If you miss a part of a letter, you can try to slip the stamp back in the impression and give it a few more whacks. As you can see, my letters are far from perfect, but I think the imperfections just make it that much more "handmade."

3. Once you have stamped out your phrase, take a permanent marker and draw over each letter. Don't worry about being careful where you mark as you will wipe off the excess ink. Focus on getting the ink deep in the grooves of each letter. Then take a little rubbing alcohol on a cotton ball and rub off the extra ink on the rest of the bracelet. This will help darken the letters a bit to make them more visible.

4. Bend the bracelet around something round to get the basic shape (I used the top of a mason jar) and then form it to the shape of your wrist. This brass is really flexible, so even if you are making this as a gift, the recipient should be able to reshape to fit their own wrist as needed. 

Have a great week, dear ones!

xo, 

 
March 14, 2016 /Hailey Faust
DIY, Metal Stamping, Bracelets, Gifts, Handmade
:: DIY, Gifts
2 Comments

Valentines Day :: Golden Eggs and Sweet Nothings

February 14, 2016 by Hailey Faust in :: Celebrate, :: DIY

A quiet morning spent exchanging sweet nothings over coffee. 

Whether you are spending today with your partner, mom, lover, kids, sister, bestie or on a marathon of self-care, I wish you so much love. 

Happy Valentines Day, dear ones. 

For Rooster this year, I made this gold leaf egg filled with flower petals and a secret love note. Full DIY on these lovelies coming soon. 

R brought me back a collection of natural baubles from his recent desert journey. This man knows me so well. 

Have a lovely Sunday darlings. 

xo, 

 
February 14, 2016 /Hailey Faust
DIY, Gifts, Valentines, eggs, love
:: Celebrate, :: DIY
Comment

DIY :: Watercolor Moon Phase Flags

January 22, 2016 by Hailey Faust in :: DIY, Gifts

I am in the midst of a deep love affair with the moon. Can you tell?

She and I have always been close, but recently we have taken things to the next level. It's serious, you guys. Every time I put pen to paper, a moon seems to find it's way to the page. I have moon magic on the mind. 

moonflag3.jpg

I think, as a species, we are hard-wired to love the moon. She and the stars were our first calendar after all. Our first discernible method for knowing when to plant seeds or hunt or harvest or get married or baton down the hatches. Ruler of the tides. Our companion in the darkest hours of the night. The thing every-single-human-who-ever-lived-in-all-of-history has in common. Our nightlight. Our sister moon.  

Tracking the ebbs and flows of the lunar calendar is a lovely way to stay connected to the rhythms of the natural world during the long dark days of winter. It also helps set clear times each month to start and finish projects, give thanks, check in with ourselves and manifest intentions. If this resonates with you, and you haven't checked her out yet, run (don't walk) over to Chani Nicholas's amazing blog. This woman is a mystic moon mama / lunar guru who has changed the way I connect to the night sky. 

I am a big fan of marking occasions, and pretty much any excuse to use gold leaf, so to honor this Saturday's full moon, I pillaged my craft drawer and created these delicate paper moon phase flags. This is one of those projects that is very forgiving and soothing to work on. A creative meditation of sorts. Light a candle, put the kettle on and curl up with the moon for a spell. 

Supplies

- Watercolor paper (at least 7 sheets)

- Watercolors

- 2 paintbrushes ( I used one soft round brush and a shader with a hard edge for details..but whatever you have on hand will work.) 

- Adhesive size for metal leafing

- Gold leaf sheets (Just a bit. I used less than a sheet on the whole project.) 

- Hole punch

- Roughly 6 ft of hemp or ribbon


Instructions

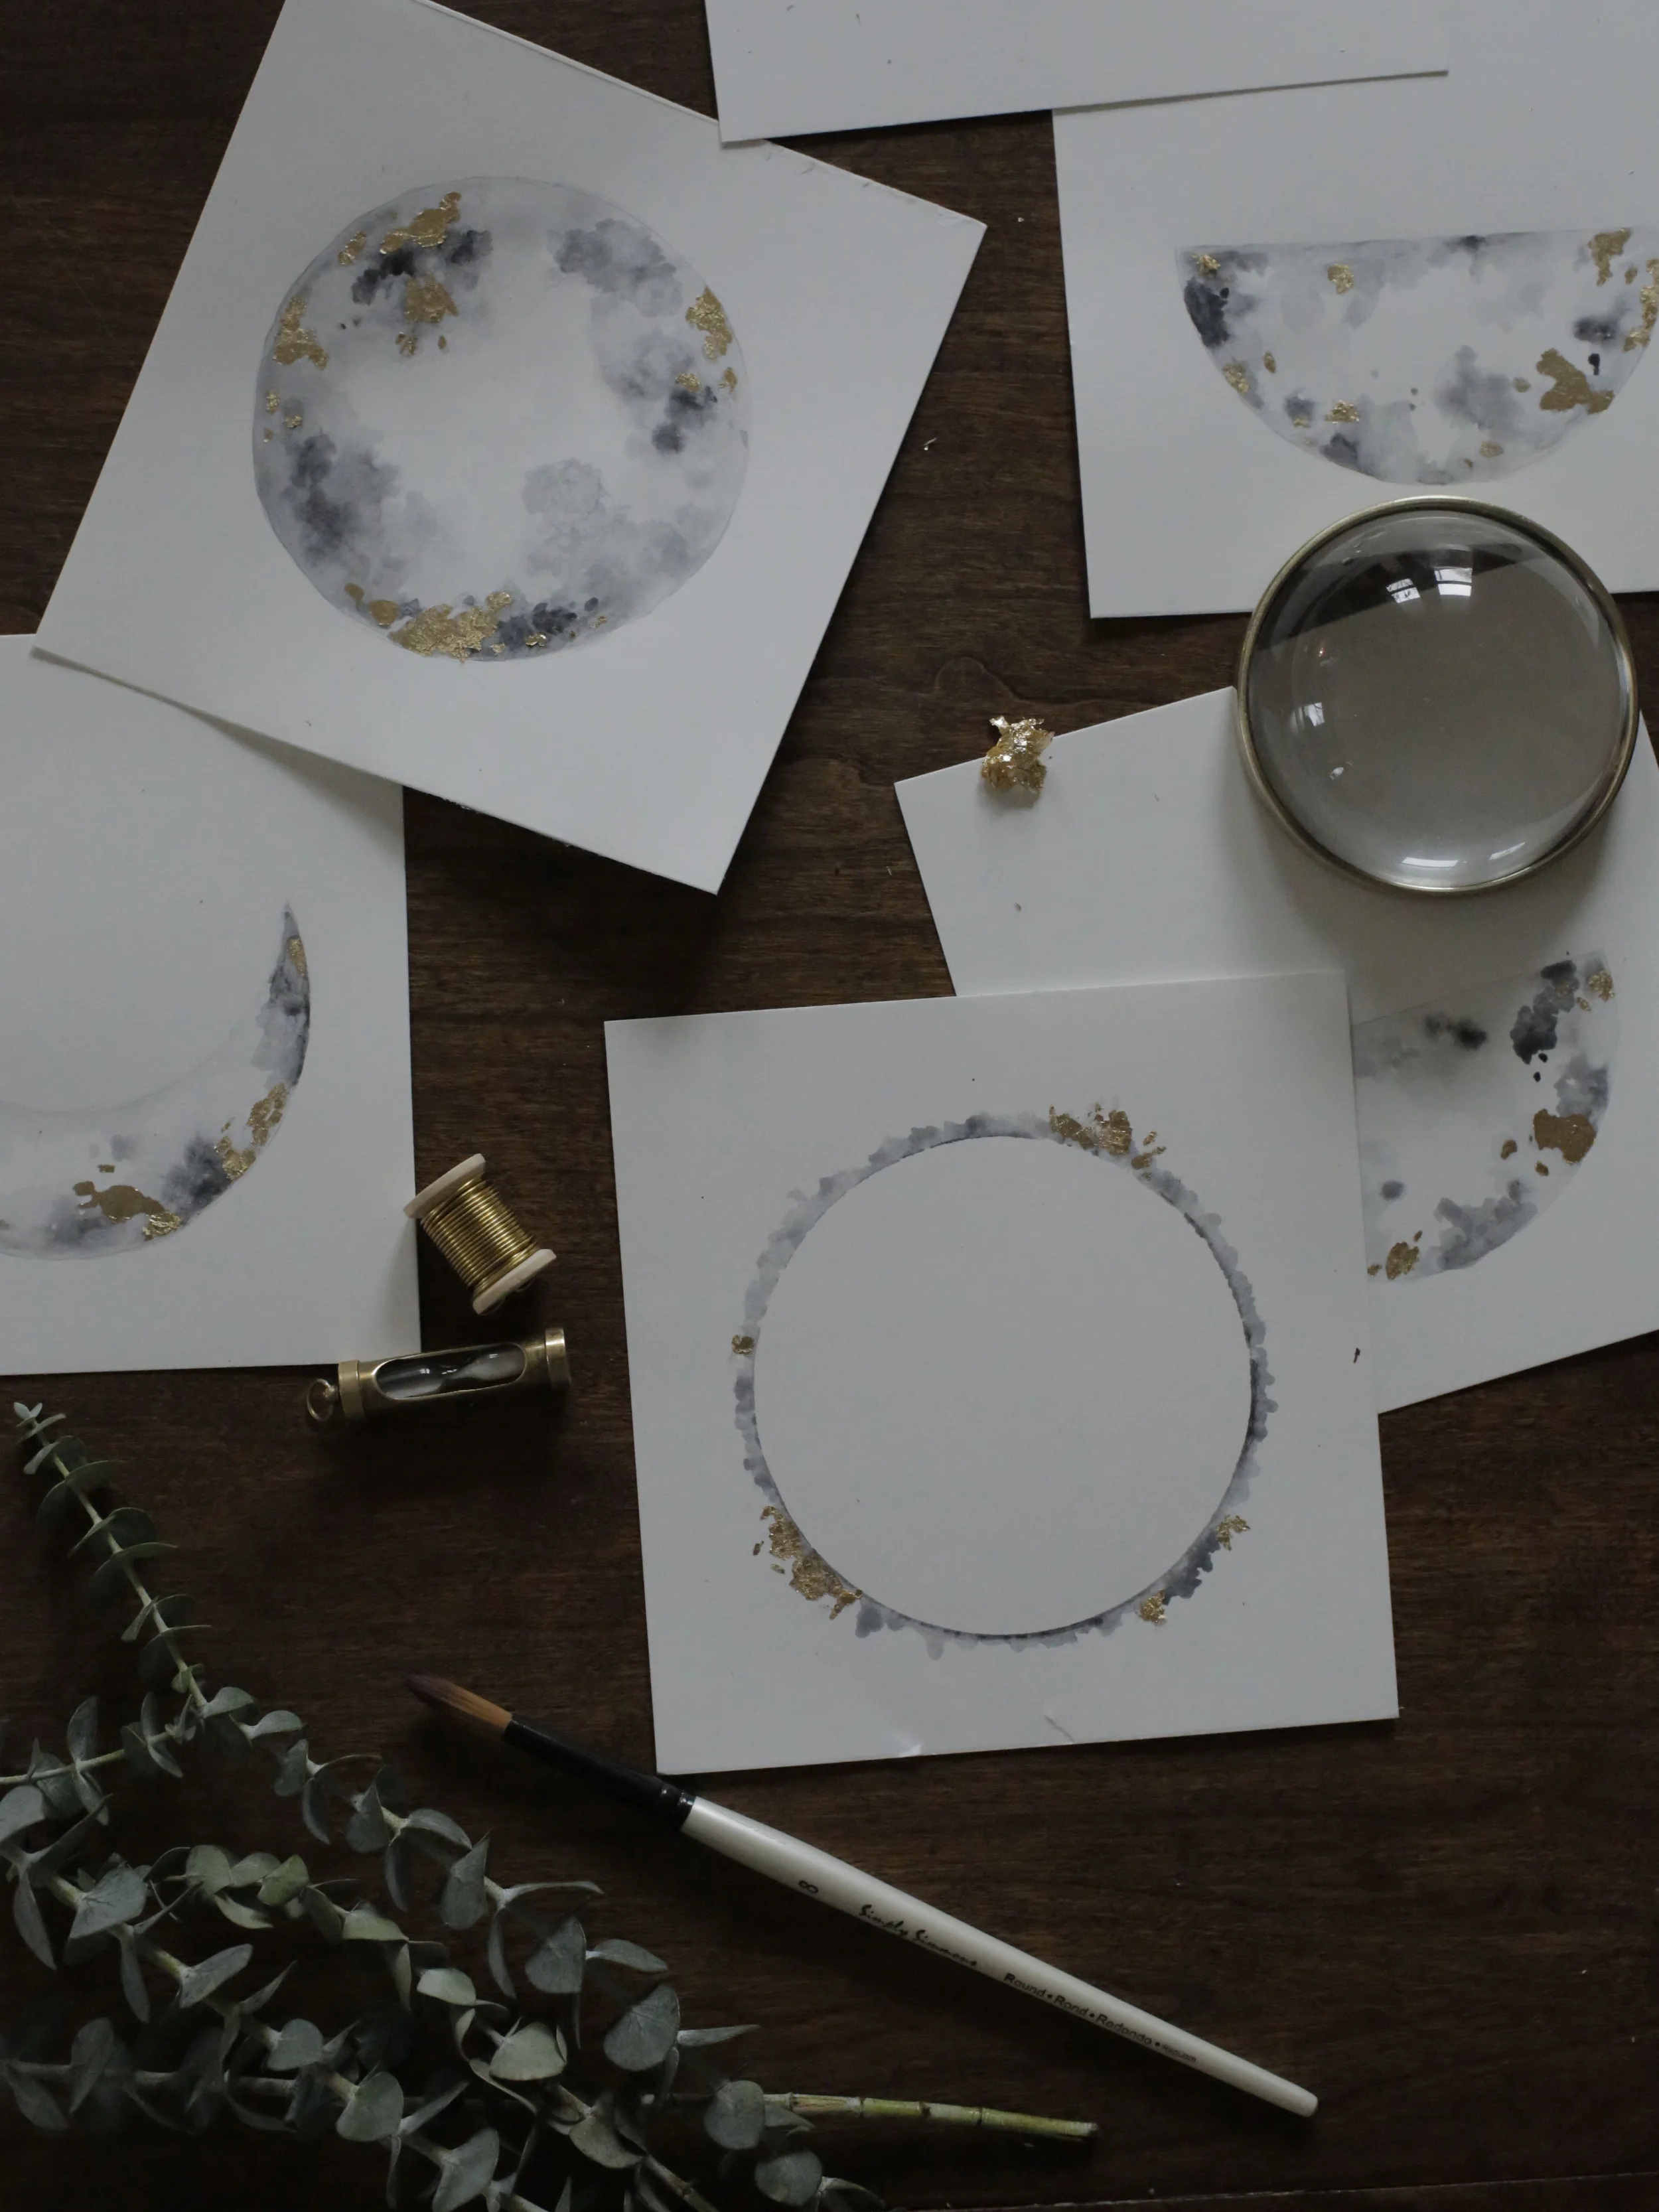
1. Start by tracing something circular very lightly with a pencil to get the shape of your moon on one of your pages of watercolor paper. I used a roll of masking tape as a guide and chose square paper so that I wouldn't have to worry about cutting the flags to an even size. 

2. Start filling in the circle with water with a wet brush. Slowly add little blooms of watered down color (I used grey) around the edges of the circle. Let dry. Repeat, allowing the layers to instersect and flow into one another. 

3. Now you can start adding some darker splotches of color for depth. Play with using less water and more paint on your brush to create craters. Layering is key. Let dry between layers. Experiment and play. My only advice would be to only add a little paint at a time and know when to stop...it's easy to go too far. I found that I liked mine best when I left a little white space within the moon. What I love about this project is that it is very forgiving. If you make a mistake, just add a little water. Easy peasy. You can also use a dry brush to brighten areas if they start to feel too dark. I haven't used watercolors in ages but I could see how they could be very addictive. So calming. 

4. Repeat process with the rest of your moon phases, using a pencil to shape out the area you will be painting for each phase. I only created 7 phases (including 2 new moons) but you could easily add as many phases as you'd like. To create the new moon, I simply splotched* (technical term) my brush around the outside of my masking tape to get this effect. 

6. Once all your phases are totally dry, get a clean brush and apply a small amount of the adhesive size to the areas of the moon you want to gold leaf. I found that asymmetrical brush strokes looked the most "moon-like" when the leaf was applied. Let size dry for 10 - 15 minutes or until clear. 

7. Apply gold leaf to the clear adhesive size. The leaf should stick only to where the adhesive was painted. I just used my fingers to apply it, taking little scraps from here and there to make interesting crater shapes. Use a soft paintbrush to gently brush away the extra gold leaf. Again, work in layers as a little gold goes a long way. 

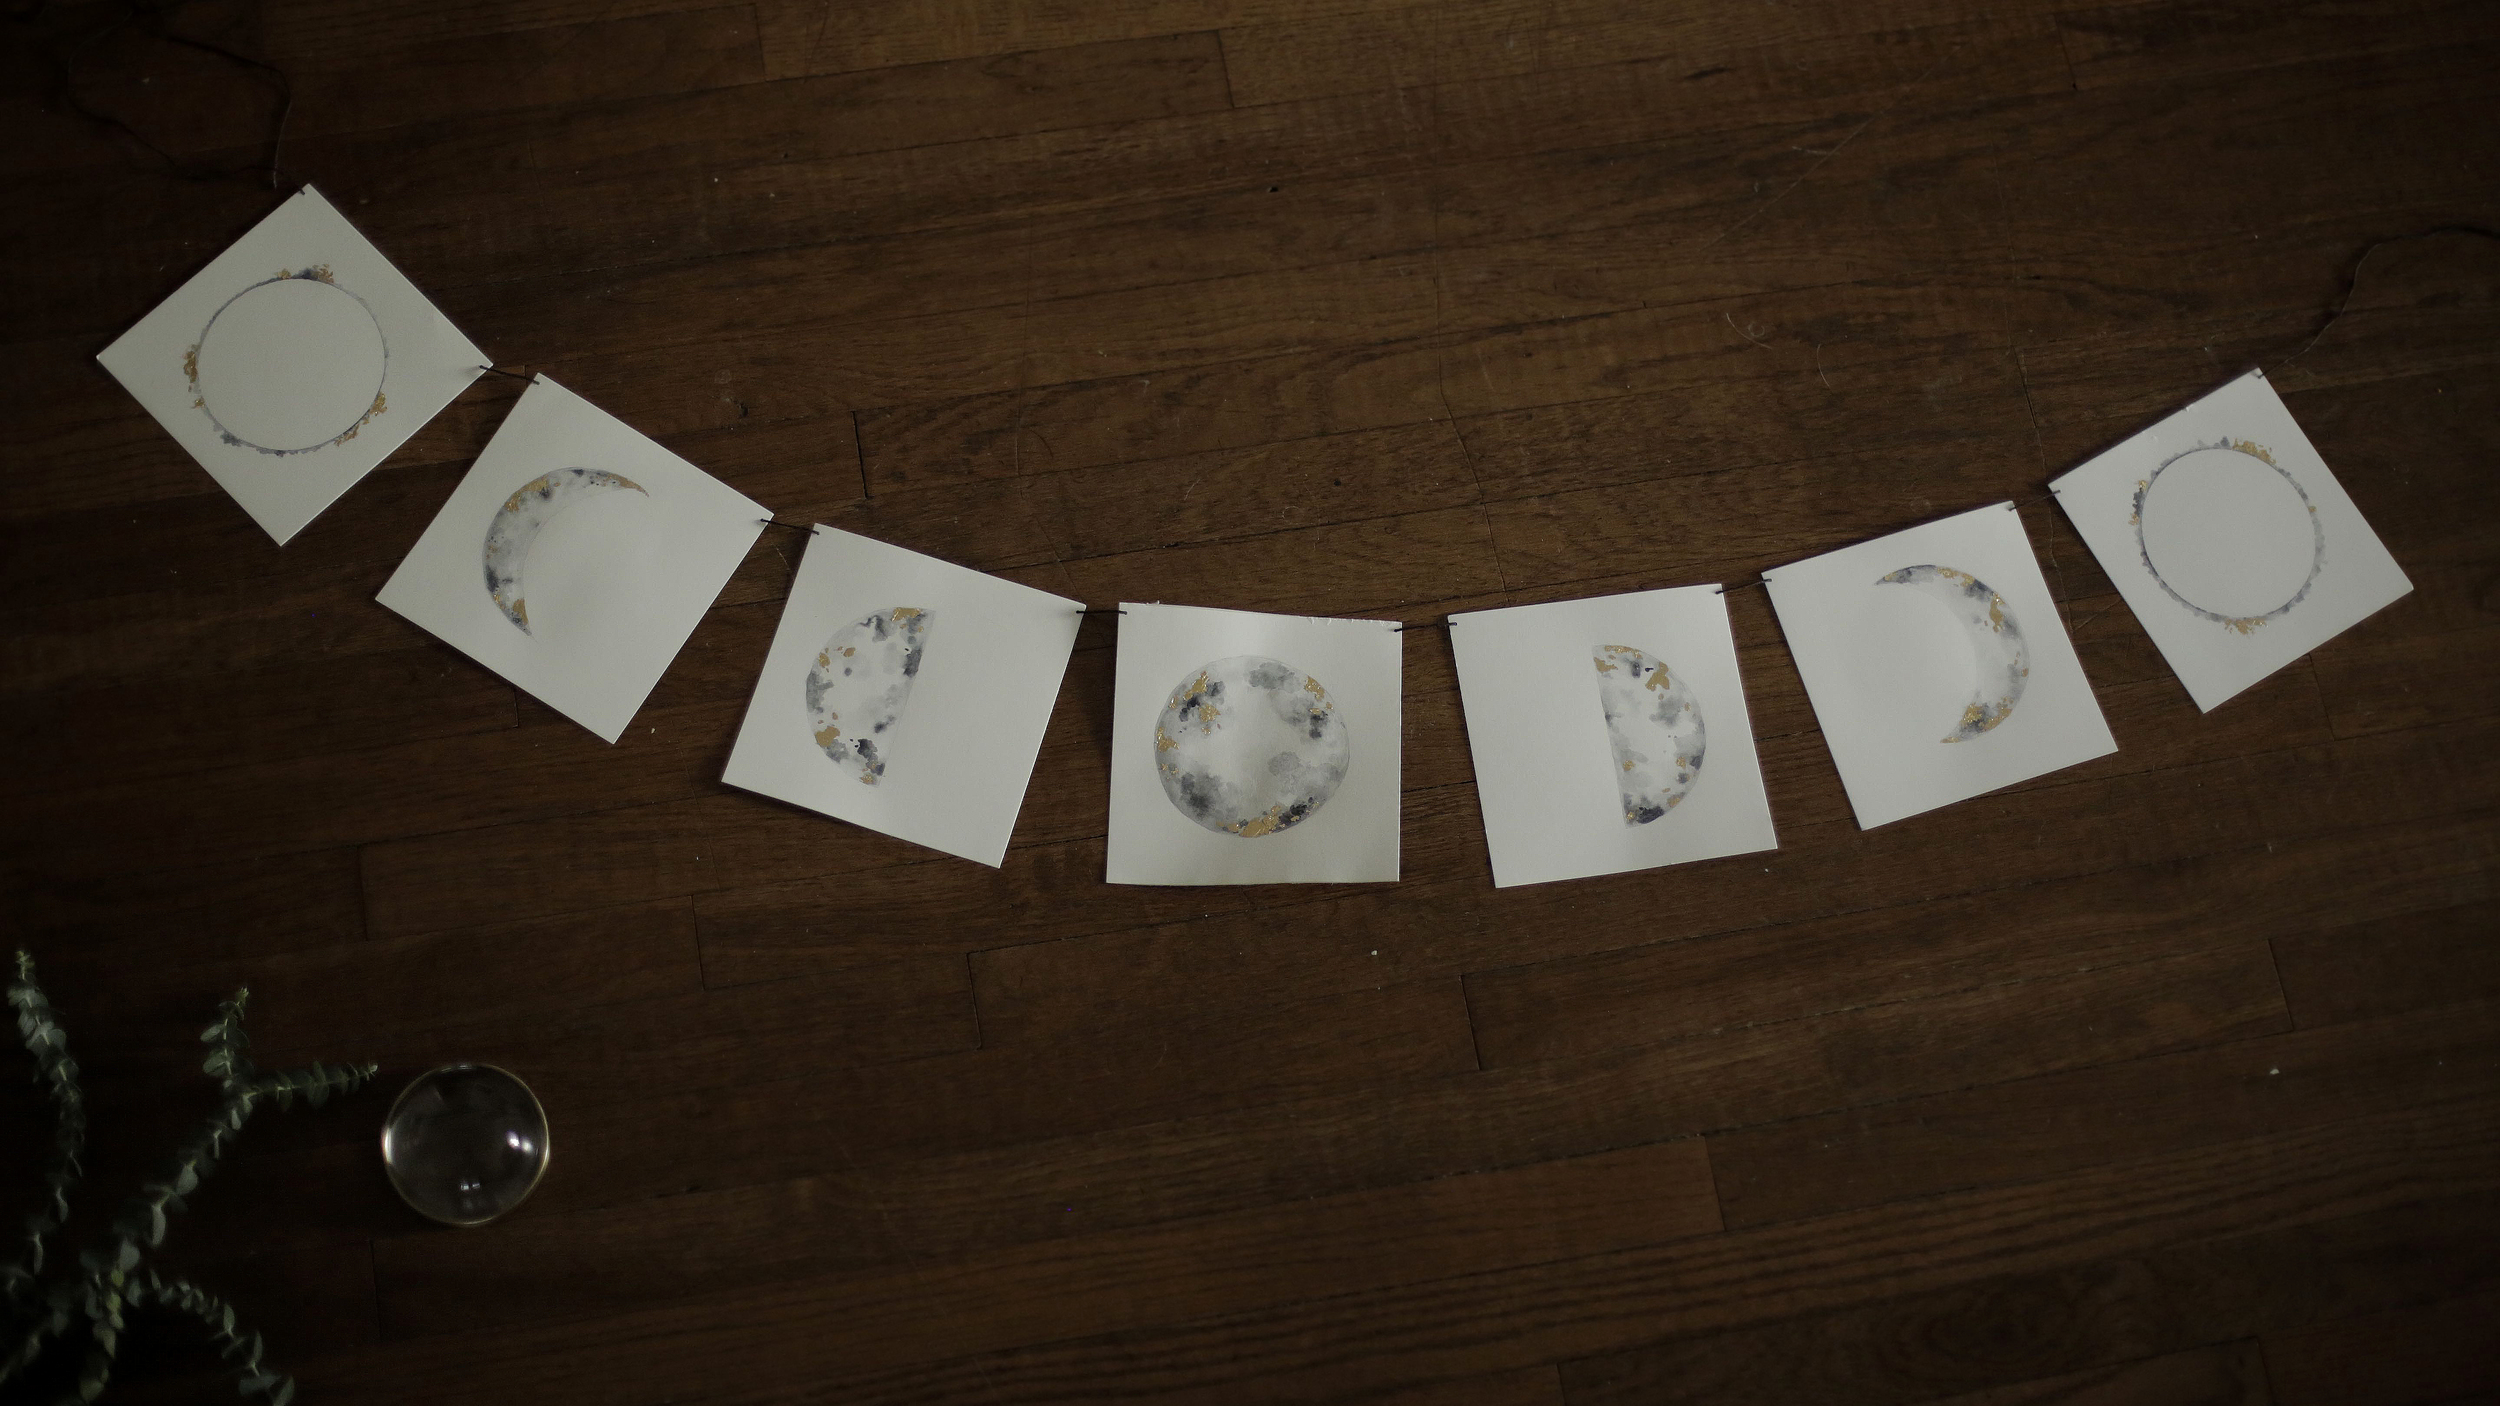
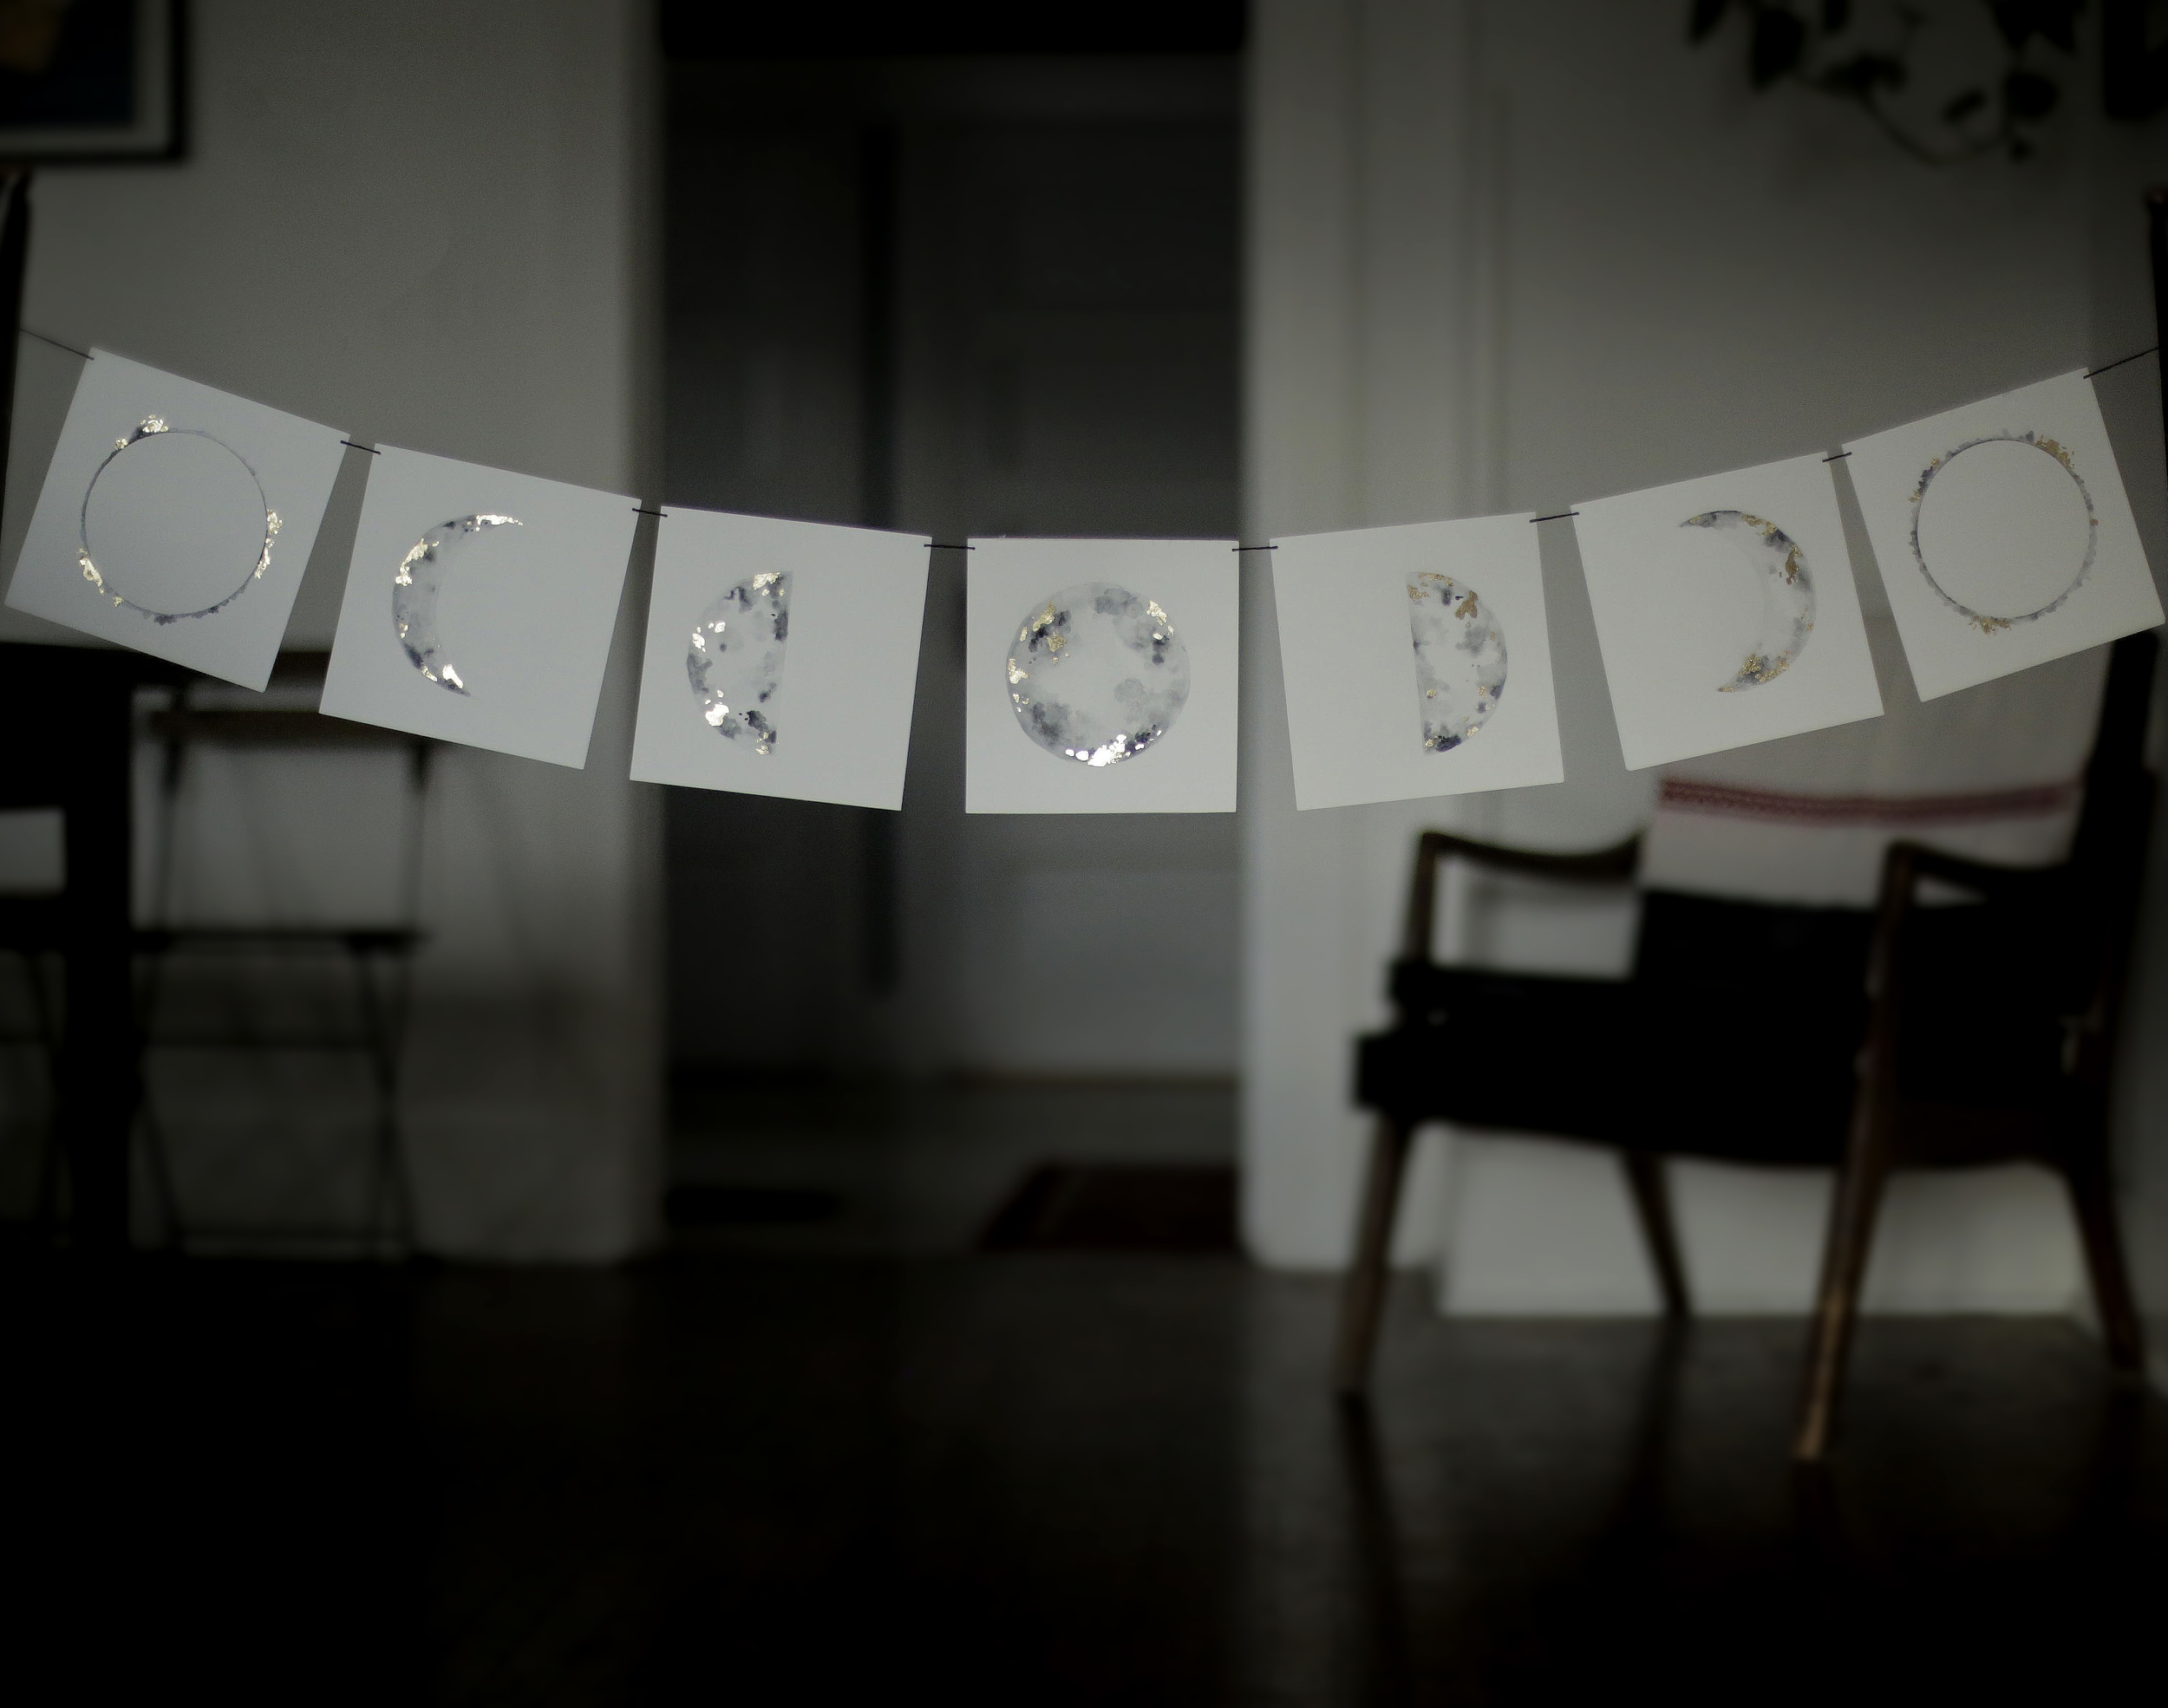
8. Punch holes in the top 2 corners of your moon phases. I used a jewelry hole punch to get teeny tiny holes, but a regular hole punch would also work. 

9. Carefully string your phrases together with twine or ribbon. Be delicate as you work, it would be easy to rip the paper. I used a little bit of candle wax on the end of my hemp to help make threading it through the holes a bit easier. Worked like a charm. Feel free to add beads or tassels or feathers to the end of your flags if you are feeling extra fancy. 

When I finished my flags I realized how easy it would be to slip them into a pretty envelope and send to a far away friend. Spread that luna love.  

Thanks for stopping by lovelies. Have a lovely cozy lazy wonderful weekend.  

xo, 

 
January 22, 2016 /Hailey Faust
DIY, gold leaf, handmade, prayer flags, watercolor, moon
:: DIY, Gifts
1 Comment
_85B2890.jpg

DIY :: New Year Moon Intention Wall Hanging

January 04, 2016 by Hailey Faust in :: DIY

I am a firm believer in the power of setting intentions. There has always been something magical for me about writing/drawing/stating goals that sets the universal wheels in motion and brings big dreams into the physical realm. The new year provides us with the perfect opportunity to meditate on what we want to bring more of into our life, what we want to release, and the concrete steps we can take to manifest our goals.

This year my goals are to finally bring the lovely wild into existence (yay!), meditate for at least 15 minutes every day, and practice photography by shooting every day until I have at least one image I sorta-kinda-almost like. What are your goals for 2016? What do you want to attract to your life?

It's easy to make resolutions, but often difficult to keep them in the forefront of our minds once the newness of the new year has worn off. What better way to gently remind of us these goals throughout the year than with a handmade piece of art hung lovingly in our home? And it's pretty! So there's that. 

This simple DIY is the perfect way to spend a lazy afternoon with a cup of tea and can likely be made with whatever bobs and ends are rolling around the back of your craft drawer. If you don't have metal stamping supplies, no worries! You can write your intentions on craft paper, ribbons or wooden beads and attach them that way. Even if noone else can read them, you will know they are there and that's the whole point. 

Materials:

*Please note these are merely suggestions. Feel free to improvise and use whatever you have to hand. Embroidery hoops can easily be replaced with wire bent to form a circle, ribbons can be used instead of yarn, etc.

- 2 embroidery hoops of different sizes

- Natural wool yarn (about 1/2 a skein)

- 1.5 ft of wire 

Optional:

- Metal stamping alphabet

- Steel block

- Metal blanks

- Hammer

Step 1: Making the moon

Start by removing the inside hoops (the ones without the metal clasps) of both embroidery hoops. These will be the hoops to form your moon. Hold the smaller hoop against the inside of the larger hoop (shown above) and play with it until you find the crescent moon shape you want. The bigger the difference in size between the hoops, the larger your crescent will be. These were the only hoops I had on hand so my crescent is more of a sliver.

Once you have a shape you like, tightly wrap the wire around both hoops to hold them together. You can use a drop of hot glue between the hoops to help it hold if necessary, but the wire seemed to do the trick for me. 

Step 2: Cutting lengths of yarn

Decide what length you would like the yarn tassels to be and multiply it by 2. I wanted my tassels to hang about 2 ft down from the moon, so I cut my yarn into roughly 4 ft length so they would be 2 ft when doubled. I wasn't sure how many lengths I would need, so I worked in chunks by cutting about 10 lengths of yarn at a time, attaching them, and then cutting again until it felt finished. 

Step 3: Attaching tassels

_85B2748.jpg

Attaching the lengths of yarn is super simple. Fold your piece of yarn in half. Pull the halfway point (or loop side) through the inside of the bottom of the moon. Now bring the tail ends up, through the loop and pull tight so that tail ends trail down below. Thats it! Now push this tassel to the right and repeat the process with the rest of your yarn lengths. The best part of this project is that you can keep adjusting the spacing between loops as you go, and keep adding tassels until you reach your desired thickness/density. 

Step 4: Adding texture

Once you have completed all your tassels, now we can add some texture. I braided a few strands and tied knots in strands here and there to add depth. Feel free to add beads, feathers, ribbons, whatever calls out to the raven in you. 

Step 5: Preparing to stamp

Metal stamping! One of my most cherished gifts this holiday was a metal stamping alphabet from my ever-crafty mother and I have been looking for any excuse to try it out...can you tell?

Start by using masking tape to attach your metal blank to the steel block. Make sure the tape is straight, as you will use this as a guide for your letters. Next, take a marker and evenly mark a dot on the tape for each letter in the phrase you are stamping. If you are feeling really fancy, you can measure these out, but I'm more of a "wing-it" kinda gal and actually like the look of imperfections. 

Step 6: Metal stamping

This was my first time stamping so I am by no means an expert, but it was definitely one of those instant gratification crafts! You may want to place your steel block with the taped blank on a book to dampen the noise a bit. Take your first letter stamp and line it up with the first dot you marked on the tape. I gave mine about 5 - 8 good whacks with a stamping hammer and it made a nice impression. Repeat the process with the rest of your letters, using the tape as a guide to keeping them straight and even. If you miss a part of a letter, you can try to slip the stamp back in the impression and give it a few more whacks. I just love the imperfect handmade feel of these!

Step 7: Attaching intentions

My blanks came with holes pre-drilled, but it would be easy enough to drill a small hole if yours did not. I attached my stamped intentions with a little leftover wire wrapped around the bottom of the moon, in between the yarn tassels. I played with pushing the tassels around until they mostly hid the wire. 

Step 8: Hang and manifest

That's it! Now hang your lovely New Year Moon Intention hanging somewhere you will see it daily and smile. Here's to good luck and good health in 2016!

Thanks so much for stopping by.

xo,


January 04, 2016 /Hailey Faust
DIY, moon, wall hanging, manifest, intention
:: DIY
1 Comment

Subscribe

Subscribe below to keep up on all the lovely!
We promise to never send spam or share your info with anyone else. For realzies. xo

We respect your privacy and will not share your information with any third parties. 

Thank you!

© 2016 HAILEY FAUST LLC. ALL RIGHTS RESERVED.